How to Make a U‐Part Wig
Posted:
February 04, 2021
Categories:
News
How to Make an U‐Part Wig
PART 1 Preparing Your Hair
1. Prep your hair for braiding.
Comb out your hair, then apply you usual hair cream and hair oil.
2. Figure out where your part will be, then section off your hair.
Decide where you want your part to be: center, left side, or right side. Use the handle of a rat-tail comb to create a V-shaped part in that area. It needs to be about 2 to 3 inches (5.08 to 7.62 centimeters) wide at the front and angling to a 1 to 2 inches (2.54 to 5.08 centimeter) wide at the back.
**The part should only reach back to the top-center of your head.
3.Temporarily braid this section.
This part is known as the leave-out. You do not have to do anything fancy for it. A simple French brai will do; the goal is to keep this hair away from the rest of your hair.
4. Create two more leave-out braids, one at each temple. Start the braids at your leave-out part, run them down your hairline, and finish at your temple. Begin each one as a French braid, then finish off with a regular braid.
5. Cornrow the rest of your hair. You need a cornrow on each side of the part, going straight back to the nape. You can braid the rest of the cornrows horizontally or vertically, but make sure that they all end at the nape.
**If you have long hair, finish off the cornrows with regular braids, then tuck them against the cornrows and bobby pin them into place.
6. Measure the length and the width of your leave-out. Measure the length of your leave-out part first, stating at the hairline and ending at the back edge. Next, measure the width, including the front and back edges. Your leave-out will taper slightly, so it's important to do both of these width measurements.
**You do not need to measure the leave-outs at your temples.
7.Measure along the back of your head, from ear-to-ear.
This is where the first weft will go. If it is too short, the wig will be too small. Make sure that you are measuring right along the hairline
PART 2 Sewing the Wefts onto the Wig Cap
1. Pin a wig-making wig cap to a wig head, then draw your part.
Choose a wig-making or weaving wig cap and pin it to a Styrofoam wig head. Use the measurements that you took earlier to draw an U-shaped part on the wig cap. A white dressmaker's chalk will work well here, but you can also use colored eyeliner as well.
**If you are doing a side part, make sure that you do it on the correct side of the wig cap.
**Place the wig head onto a stable stand. You can use a special stand made specifically for wig heads.
2. Turn the cap inside out, pin it back to the wig head, and sew your first weft.
The first weft needs to go from ear-to-ear, along the bottom edge of the cap. Bring the thread down across the weft. Push the needle through the wig cap and out again, this time above the weft. Continue sewing until you reach the other side. Do not cut the weft.
**Anchor the weft to the wig cap with a double knot.
**The weft must match the distance between your ears along your back hairline. Refer to your measurement!
**Use a thread color that matches the wig cap.
3. Flip the cap over and continue sewing the weft.
Take the wig cap off of the wig head first. Flip the cap right-side-out, then pin it back to the wig head. Continue sewing the weft to the wig cap, just above the hem.
4. Cut the weft, and start your next row.
The new row needs to start ¼ to ½ inch (0.64 to 1.27 centimeters) above the first one. Keep sewing until you reach the other side of the wig cap. At this point, you can cut the weft, or fold it back on itself and continue sewing the next row.
5. Continue sewing row upon row of wefts.
Work your way from one side of the wig cap to the other, bottom to top. When you are about ¼ to ½ inch (0.64 to 1.27 centimeters) away from the drawn part, stop.
**Sew the final rows as close together as possible. This will make it easier to style the wig as well as blend it with your own hair.
PART 3 Finishing the U-Part
1. Pull the wig off of the wig head and cut away the part.
If you used sewing pins earlier, be sure to remove those first. Once you have the wig off, use a sharp pair of scissors to cut the wig cap right along the lines that you drew. Do not cut right next to the left weft; you will be adding one more.
2. Sew the final weft right to the cut edge.
Anchor the weft to the edge of the wig cap with a double-knot. Sew the weft to the part, this time looping the thread over the raw, cut edge. When you reach the opposite end, knot and cut the thread, then cut the weft.
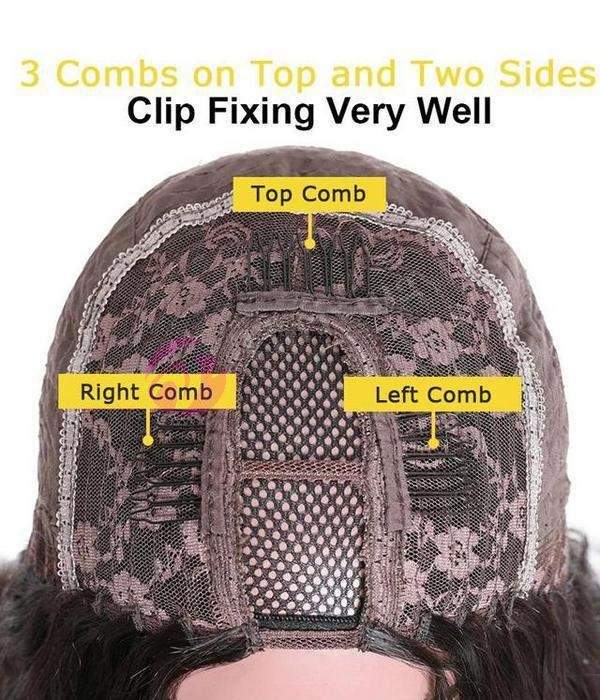
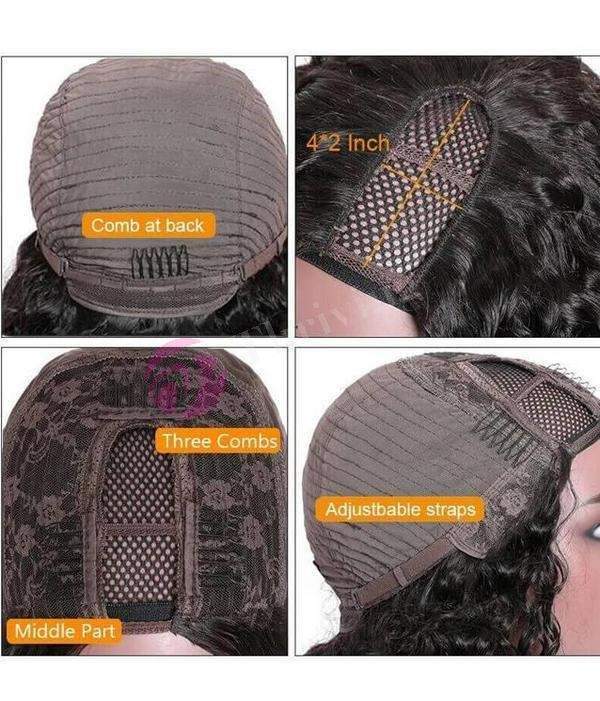
3. Sew combs to the inside of the wig.
Choose a set of flexible wig combs that are the same length as your U-part. Sew the combs to each side of the part, with the teeth facing away from the part. Sew another set of smaller combs to the nape of the wig, with the teeth facing away from the hem.
**If your wig cap has seams, line the two back combs with those seams.
**If your combs have stitching holes, use two stitches per hole.

PART 3 Wearing the Wig
1. Put the wig on. Make sure that you insert the combs onto your braided hair. The combs on the part will need to be inserted into the braids to either side of the leave-out. The combs on the back will need to be tucked into the braids on the back hairline.
**If your combs snap shut, be sure to snap them shut.
2. Unbraid your leave-out hair.
This includes the braided at the part as well as at the front hairline and temples.
3. Part your hair down the center.
Slide the handle of a rat-tail comb down through the center of your unbraided leave-out. Brush the hair on the left towards the left, and the hair on the right towards the right.
4. Blend the wig into your hair, as needed.
This depends on your hair texture and the texture of the wig. If your hair is natural, simply manipulate it with your fingers until it merges with the wig and hides the edges. If your wig is straight, do the following:
**Straighten the fibers further, if needed.
**Straighten your hair at the temples and to either side of the part.
**Straighten the hairs at your part again, this time including some of the wig fibers as well.
5. Apply some shine serum and edge control.
Apply the shine serum throughout your wig, especially the ends. Lastly, apply some edge control to the fine hairs at your temples and hairline
Related Products


Comment(s)
